

- In-depth guide to using a drone with a thermal camera;
- Emissivity and atmospheric conditions - how they affect your results;
- Learn about the thermal colour palettes and what they mean;
- Isotherms, high/low grade and thermal sensitivity - thermal imaging terminology explained;
- Radiometric vs Non-radiometric - what's the difference and how they impact your data.
This picture instantly shows the benefits of using a drone with a thermal camera.

Captured by London Fire Brigade, this thermal image - clearly showing the hot spots of the blaze - enabled crews to specifically target the source of the fire, instead of focusing on the plumes of smoke which were coming from another part of the building.
Such situational awareness is invaluable, and it's no secret that thermal imaging can benefit a range of industry applications, from public safety through to industrial inspection.
Sounds great! But it's important to remember that, no matter the advancements in drone thermal imaging technology, it is not as easy as simply deploying the aircraft, pressing record and capturing thermal data.

Thermography is far more complex than that, with a host of factors determining the quality of your results.
Things like emissivity, distance from your target, atmospheric conditions, time of day and even choosing the right thermal colour palette all need to be considered.
To help you harness the power of thermal technology, we've prepared this in-depth guide to using a thermal camera.
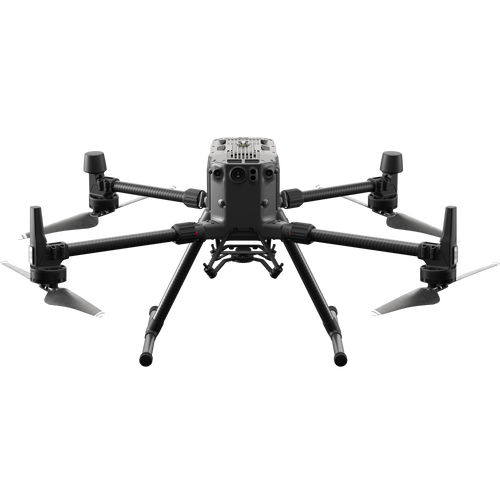
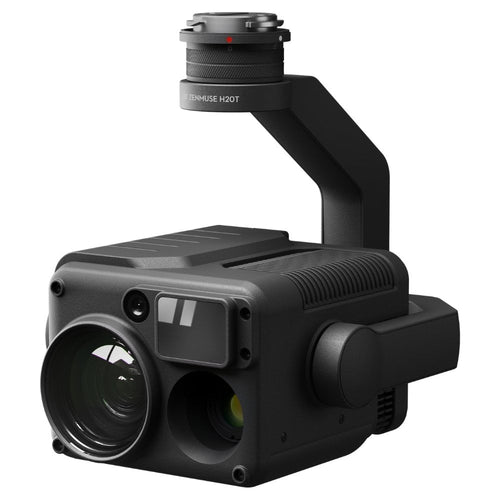
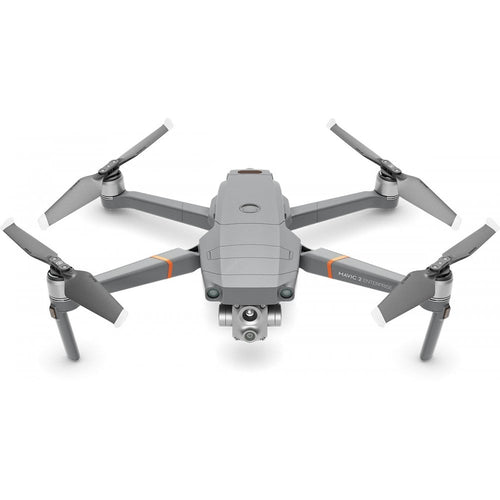
To learn which thermal drones and cameras are best for you, read our blog here, but in a nutshell, some of the best include the DJI M30T, the Mavic 3 Thermal, and the M300 RTK with H20T camera.
What Is Thermography?
Thermography is the process of using sensors to create images of radiation in the Infra-Red (IR) section of the Electromagnetic Spectrum (EMS).
Radiation is emitted by everything around us (above absolute zero) and includes visible light (which occupies a small part of the EMS) and non-visible light.
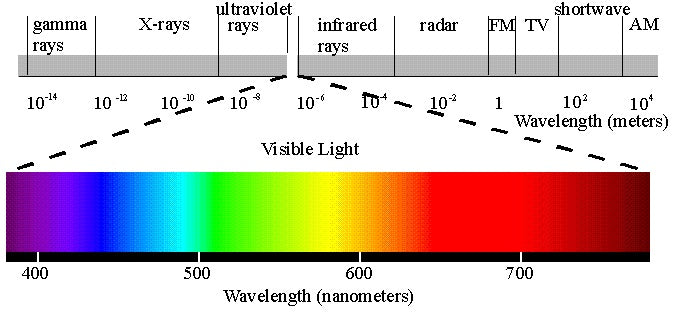
Infrared isn’t visible to the human eye, but you can feel it as radiated heat when it increases in intensity.
Thermal sensors capture infrared images, thus allowing people to see what their eyes can’t: Invisible heat radiation emitted or reflected by all objects, regardless of lighting conditions.
Once you convert it to a visible image, you can differentiate between temperatures by assigning them a different colour.
Thermal Vs Visible Light Data Set
Thermography enables the assessment of temperature based on radiation.
The below image depicts the same scene captured using an optical sensor and a thermal sensor, however, as you can see, the data provided is completely different.

Whilst the optical sensor is sensitive to visible light, the thermal sensor is sensitive to radiated energy. The hotter an object is, the more thermal energy it emits and generates a heat signature.
In the above example, courtesy of Keltbray using the DJI M300 RTK and H20T camera, the thermal image detected an overheating cable joint - highlighted by the bright red and not seen on the visible image. You can read the full blog here.
Thermal Sensors And Accuracy
The accuracy of the data provided by the thermal sensor is influenced by a number of factors.
Using a thermal sensor is not as simple as a point-and-shoot camera. Indeed, the accuracy of the data provided by the thermal sensor is influenced by a number of factors.
Primarily, the distance between the sensor and the subject. The optimum distance is 5m between sensor and subject. Needless to say, a drone will seldom be as close as 5m to its target, therefore, the greater the distance, the less accurate the data.
Emissivity And Reflectivity
When talking about how effectively an object gives off its thermal energy, we talk about its emissivity.
Emissivity is measured on a scale of 0.0 (Perfect reflector - low emissivity) to 1.0 (Black body - high emissivity).
Different objects give off thermal energy differently, based on various factors, such as what it is made of and its surface condition.
Objects such as people, animals and rocks have high emissivity, whereas shiny metals, for instance, typically have low emissivity, so they're reflective, but this can change if they are painted or corroded.
Indeed, shiny metal objects reflect significantly more radiation than dull or matte objects.
When two objects are close together in
For instance, this picture shows the roof of a building which is made of the same metal material, but the section on the left is new and hasn't been painted and is reflecting the cold sky.

Thermal refection is a common cause of inaccurate data and is caused when a surface reflects radiation from a different source. High reflectivity objects and surfaces include:
- Glass
- Metals
- Mirrors
- Wet Surfaces
- Bodies of water
Prevention of thermal reflection can be achieved using a variety of methods, such as adjusting the viewing angle and identifying the source.
It is important to remember that, not only will most of the thermal energy you see from a drone be emitted or reflected
How The Atmosphere Impacts Thermal Readings
Atmospheric conditions also play their part in thermal readings, with factors such as air density and humidity interfering with the accuracy of your results.
Warm air with high humidity will reduce the transmission of infrared energy between the subject and your sensor. Consequently, your results will appear colder than the actual surface temperature.
The effect of the atmosphere on measurement accuracy increases with the distance between the drone and the object. Therefore, your thermal measurements will increase in accuracy the closer you fly to the subject.

Other atmospheric conditions, such as rain, smoke, snow and strong winds, will also reduce the transmission of infrared radiation and impact your results.
And the higher the humidity, the greater the effect. Rain, for instance, decreases the temperature between objects.
Time Of Day
Sunlight has a significant impact on the accuracy of the data captured by the thermal sensor and therefore, direct or reflected sunlight should be avoided when using thermal sensors.
It is also worth bearing in mind three inter-related environmental factors:
- Diurnal cycle
- Solar loading
- Thermal crossover
The diurnal cycle is the process of the sun coming up and going down.
The longer the sun is up and the clearer the sky, the more radiation is absorbed by things on the ground.
When the sun goes down, that stored radiation is given back off to the atmosphere.
The more solar radiation is absorbed, the harder it can be to make out things on the ground. This is know as solar loading.
As the scene you are looking at absorbs more and more radiation, the temperature differences between the object of interest and its surroundings gets smaller and smaller.
When the scene is solar-loaded, it can be very hard to tell one thing from another
And this is where thermal crossover comes in. Thermal crossover happens when the apparent temperature difference between the object of interest and the immediate surroundings is reduced to the point where the camera can't discern between the two.

In some cases, what looks warm in a cool background can be reversed and look cool in a warm background.
It is important to remember that heat energy and temperature are not the same
Resolution Of Your Thermal Camera

Understanding Thermal Palettes
Thermographers can enhance the effectiveness of their missions by utilising thermal colour palettes.
Before we go further, look at these four pictures. What do you notice?

It is the same data set, but different palettes have been applied to display the same information in different colour ranges.
This can help with identifying subtle differences in temperature range by displaying in monotone, duotone, tritone and more, which in turn can help detect suspects/missing people, fire hot spots, defects or other objects of interest.
Certain colour palettes are ideal for certain applications: Understanding what they represent and how best to use them in the field in any given situation is essential for making the most of your thermal camera.
For instance, the picture below shows four images of the same fire - but look how the top two colour palettes either obscure the building or show the blaze as one big blob, while the bottom two - especially the mutli-coloured palette on the left - provide much clearer details of the flames and hot spots.

The basic colour palettes are White Hot and Black H

Below is an overview of what the different palettes mean.
| Thermal Palette | Description |
| White Hot | The most commonly used pseudo colour, using white for high temperatures and black for low temperatures, which is a natural association for people. The versatility of White Hot makes it appealing for use in shifting landscapes and urban areas. |
| Fulgurite | Dark red represents low temperatures and white represents high temperatures. The warm tone of this palette aligns with people's association with hot temperatures. |
| Iron Red | This palette displays nuanced differences in heat signatures, quickly displaying anomalies and human bodies. Hotter objects appear as light warm colours and colder objects appear as dark cool colours. |
| Hot Iron | Red represents high temperatures, and cool colours represent low temperatures. It is able to identify hot targets quickly, while showing the details of cool targets. |
| Medical | This palette shows nuanced differences in temperatures, and is therefore ideal for scenarios with small temperature changes. In environments with low contrast, it is still able to detect objects and slight temperature changes. It is mainly used in the medical field for human body temperatures. |
| Arctic | Uses the same palette as Medical, except switching the purple for a cool blue to better reflect temperature changes. |
| Rainbow 1 | Similar to Medical, it reduces the warm colour ratio and increases the cold colour ratio for high temperature targets to better show the details of cool targets. |
| Rainbow 2 | The colour transition is reduced, the warm and cold colours are moderately proportioned, which can show the details of high and low temperature targets at the same time. |
| Tint | Using black and white for low temperatures and bright red for high temperatures, it is able to detect high temperature targets quickly. Mainly used for high-contrast environments, ideal for quickly and accurately identifying high temperature targets at night. |
| Black Hot | The opposite of White Hot, using black for warmer objects and white for cooler objects. The heat distribution of high temperature targets can be better observed when outdoors. A favorite among law enforcement and hunters, Black Hot displays body heat in a clear, lifelike image. |
When it comes to selecting and interpreting thermal images, there is not necessarily a right or wrong answer. Some people might think that White Hot doesn't give enough detail, while others may find the multi-coloured images distracting.
One suggestion is that White Hot and Dark Hot are your go-to palettes when the detection of small, faint heat differences are your primary goal - such as during a search and rescue mission - or when operating in challenging environments with lots of heat and humidity.

For instance, this video shows how Lincolnshire Police used the white hot palette on the DJI M30T to find two missing people.
Meanwhile** our operational success continues with our new @DJIEnterprise #M30. Video from Sunday shows two High Risk Missing Persons, located in the dark, in a field by the A15 #thermal #camera. This #drone find ensured quick safeguarding & helps free up @LincsPolice officers. pic.twitter.com/Vv0h1bPLwK
— Lincolnshire Police Drones (@LincsCOPter) June 23, 2022
On the other hand, the likes of Iron Red are good

Despite all of this, user preference is one of the most significant factors when it comes to choosing and using thermal colour palettes.
What Are Isotherms?
Isotherm settings allow the operator to highlight certain temperature ranges and make them stand out in real-time.

In other words, the Isotherm feature enables the designation of a defined temperature range using the selected colour palette.
Temperatures which fall outside of the defined range will show as a simple monotone. This is beneficial for the user to emit anything which falls outside of the temperature range of interest due to the visualised high contrast leading to data omittance.
Isotherms are best deployed when you want to focus on a specific temperature band. For instance, firefighters can use this tool to highlight any remaining hotspots after a fire has been extinguished in the area.
Or for inspection, isotherms can help detect potential condensation sites within buildings.

Isotherms can make sure you don’t fail to spot something significant in your image, but they can also be misused. For example, it’s not recommended to use isotherms for search and rescue missions, as there are usually too many variables - including emissivity, reflexivity and atmospherics - in play.
Thermal Imaging Terminology
When using a thermal camera, and flicking through the settings on your DJI thermal drone or sensor, there will be a range of thermal terms.
Range
Range is an important feature on a thermal camera and relates to the spectrum of temperatures the sensor can measure.
Thermal cameras can have more than one range setting - ie High Gain and Low Gain - making them adaptable in different scenarios.

For instance:
- High Gain: This is the measurement range for lower temperatures.
- Low Gain: This is the measurement range for higher temperatures.
Both the DJI Mavic 2 Enterprise Advanced and the Zenmuse H20T camera for the M300 RTK drone have High and Low Gain modes which measure the following temperature ranges:
- High Gain: -40 °C to 150°C
-
Low Gain: -40 °C to 550°C
This can be adjusted in the DJI Pilot app’s IR camera menu by selecting Gain Mode.

Thermal Sensitivity (NETD)
Thermal sensitivity is also referred to as Noise Equivalent Temperature Difference (NETD). This metric refers to the smallest possible temperature difference the camera allows you to see.
Therefore, the lower the NETD value - specified in millikelvin (mK) - the better the sensor can register small temperature differences and yield better quality results.

Thermal Spectral Band
Every thermal camera works across a specific band that’s measured in micrometers (μm).
This determines the range of wavelengths on the electromagnetic spectrum that the camera’s sensor can detect.
The H20T and Mavic 2 Enterprise Advanced feature a longwave spectral range of 8µm to 14µm.
Field Of View (FOV)
Just like an optical camera, the Field of View relates to how much of a scene a lens can see.

If you're close to the subject, the a wide angle lens will offer more useful thermal images.
But a more narrow lens can be more useful if you’re observing your subject from a distance, as it will enable you to home in on a particular part of the scene.
MSX - Multispectral Imaging for thermal surveys
Multispectral Imaging overlays two or more images captured by different sensors to enhance the imagery.
The optical centre can be aligned and overlayed onto the thermal sensor to provide additional clarity and information not visible to the thermal sensor alone, as these two images of the same fire show.

Radiometric vs Non-radiometric Thermal Imaging
Thermal cameras can be either radiometric or non-radiometric. So what’s the difference?
A radiometric thermal camera holds an actual temperature value for every pixel in your image, whereas a non-radiometric sensor only contains a visual representation of the measured value of radiation at the time the image was captured, and no other data.

As a result, radiometric data enables retrospective adjustments of basic parameters (such as emissivity, distance from the object, reflected temperature, humidity, etc.) or for the data to be further interrogated. In contrast, there is no possibility of conducting post-evaluation on data captured by a non-radiometric capture, as the image is the only data provided.
Therefore, radiometric cameras provide quantitative data, while a non-radiometric sensor collects qualitative information.
This doesn't mean a non-radiometric camera should be scoffed at - far from it. In many cases, it all comes down to the application at hand.
For instance, quantitative data is more suited to utility inspection and condition monitoring, where specific temperature readings on sections of a powerline, for instance, are required. In comparison, qualitative data is valuable for a firefighter or during a search and rescue, where detecting an abnormal heat signature is more important than the temperature itself.

For the record, cameras such as the H20T and the Mavic 2 Enterprise Advanced have radiometric capabilities and the thermal data can be analysed in the DJI Thermal Analysis Tool. As the captured data is radiometric, detailed temperature analysis can be carried out, as this image shows.

Interestingly, Teledyne FLIR has re-released and renamed the TZ20 sensor: The original was non-radiometric, but has been superseded by the TZ20-R, featuring dual radiometric sensors, and can be integrated with the DJI M300 RTK or DJI M200 Series V2.
DJI Drone Thermal Imaging Tools
Recognising the importance of aerial thermography, DJI has engineered numerous drones and sensors to help operators collect the best data possible.
As part of this commitment, operators have a range of tools at their fingertips to further enhance their thermal missions.
Some of these have been mentioned during the blog, but the below infographic gives an overview of these tools and how they can help you:

Drones And Thermal Imaging - Train, Train And Train Some More
Used properly, a drone with a thermal camera is a highly-effective tool, which can save lives, help fight fires and spot defects early.
However, to truly harness the power of thermography, it is essential that drone operators hone their skills and really grasp the application - before deploying on a mission.
This includes understanding which thermal palettes work for you in different scenarios, operating environments and times of the day. This could be the difference between success and failure.

A big part of using a thermal drone is spotting abnormalities. But how will you know what is normal and what isn't if you don't practise and understand your own environment? This is why practice really is crucial.
heliguy™ runs numerous training courses - such as the Emergency Services Drone Operators Training and the Drone Assistive Programme - to help drone enterprises prepare for mission-specific scenarios, including thermal application training.
To speak to us about training or any of the drones/cameras mentioned in this article, give us a call or send us an email and our enterprise team will happily assist.


Leave a comment